Photobucket

Sunday, October 21, 2012

Oh my heck, it has been a while!

Aloha Friends!

It has been awhile, hasnt it? I have done some small sewing projects but with the beginning of school, a change of grade level, and wedding plans coming together I have been busy planning all of them (and sewing for them)! Seeing I am home sick I decided to do some catch-up blogging! This is a quick run down on what I have been doing...

First Project: 
I have made some pillows (cat and the hat themed for my classroom) and made a skirt to match my classroom). I used the Colette Ginger pattern. I will take a picture of myself in it in my Seussical classroom when I finally wear it!
The Facts
Fabric: Cotton fish and a fleece upper (not the best choice).
Year: modern
Notions: zipper
 Time to complete: It was a UFO because school started. Could not have taken me more than a few hours though.
First worn: I just finished it! I wanted to wear it the first day of school at the end of August... (only 2 months late).
Wear again? Yes! Only to school though.

Second Project:
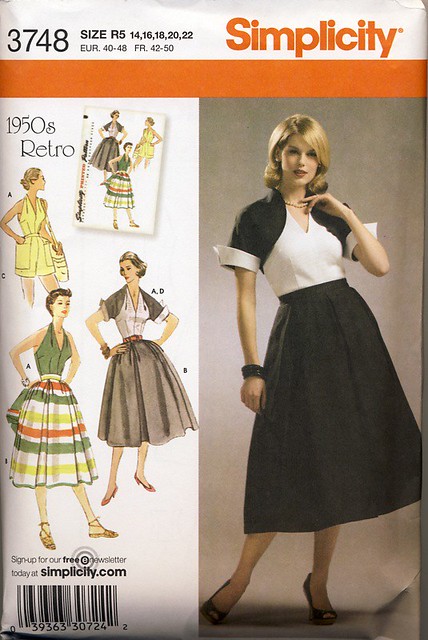
The shorts I was talking about from Simplicity 3748 in a prior post fit my friend beautifully. I finished them and gave them to her as a gift. (My first garment I have ever given as a present). I am waiting for her to send my a picture of her in her new shorts. I made a super cute insert to go in with the garment. My mom ordered me some circle seals for the tissue paper and I put this insert in with the shorts.


Third Project:
Fall always brings the "I have nothing to wear!" statements. Fall here in Las Vegas is not cold but you do not want to wear your pastel summer loving colors to events, just for the pure principal of it! So I was at Joann's 50% off red tag fabric (they always get me to spend so much money when they have those!) I saw some super cute fabric (mostly summer *sigh*) There was this cotton chicken/rooster fabric I thought would be just perfect. It is not hot (fall here in Vegas is 70-85 degrees) but it still looked "fall-ish".
 
Cute, huh?
 I am making another swing skirt with this material. I am using my tried-and-true modern pattern I used for my Christmas and Thanksgiving and Day of the Dead (not on here) skirt I got a super cute home-made yellow knitted shirt to go with it (pictures to come soon- I am sick again and no one wants to see what I am working with at the moment).

The Facts
Fabric: Cotton from Joann's Fabrics. $2 (it was their 50% off sale) a yard... 4 yards ($8)
Lining- None... I always wear a petticoat I purchased from mybabyjo.com
Pattern: McCalls 5811. I do widen the waist band substantially.
Year: It's a "new" pattern but lends itself perfectly to a circle skirt.
Notions: 7" ziper, hook and eye (or button), iron interfacing for waist.
Time to complete: Under 4 hours.
Changes: I use a heavy weight fusible interfacing in the waistband (that I widen). I add a pocket on the right side seam, and I am not sure on the closure on this one but I sometimes use different buttons.

 I must say now that I finally have a machine that does zippers I am getting much better at installing them! Check it out!

I could not get it to turn around... stinkin' blogger ;)

Fourth/Fifth Project:
I am still working on Rich's shirt (I have decided I do not like men's wear) and I am going to make a rough draft of these pants:

Tuesday, August 7, 2012

Colette Jasmine 2

I finally finished this shirt and got to wear it on our mini vacation to Reno! I had orginially planned on tucking it into highwaisted capris and wear my remix shoes (see below) but sadly, I must have eaten one (ok 13) too many cupcakes and it just did not look good!  Don't freak out, I am on the path of working off those cupcakes! I wish it was so easy to get rid of the cake as it was to eat it! Anywho, let's get down to the nitty gritty:

The Facts 
Fabric: black and cream nylon. I can not remember the name of it. Feels like peach skin.
Lining- none.
Pattern: Colete Jasmine
Year: modern. I think it has a vintage feel though.
Notions: just interfacing
Time to complete: I can not remember the time. It was a UFO for a bit...
First worn: July 2012.
Wear again? Yes!Hopefully when I am a little less "fluffy"
Changes: I made the arm hole a little wider. Not by much. I changed the seam allowance from 5/8 to 1/4ish and it worked out great. I plan on making this again but I would add a little width to the collar. I was not a fan on how the collar sat. I ended up tacking it multiple places so it sat how I wanted it to. 

I even like this without sleeves. I see a tank top in the future!

Finally done!

I love this stitch. They used it so much in the 50s to finish things. I used clear thread to not contrast on the cream/black.
Please ignore the faces I am making. We had just traveled 9 hours and were heading to get a bite. I was a little quirky feeling to say the least! As you can see I opted, because of the extra fluffy filling ;), to wear my cigarette pants from billie jo retro.
A


 Pictures from my Previous Post:

Orange Creamsicle

Honestly, I have not been hiding! Mid July we went to Reno for a wedding and it seems like after that it has been a whirl-wind of "to do". The school year is almost starting so this teacher has been busy making her classroom Cat in the Hat-tastic (more pics on that later). But, back to the wedding- this is the dress I made to wear to the wedding. Love it.

The Facts
Fabric: Cotton from Joann's "baby" collection. $1 a yard!
Lining- Lined with the same fabric.
Pattern: Vintage Vogue 8789
Year: circa 1957
Notions: zipper and 3 hooks
Time to complete: I can not remember the time. It was not very long once I got the darts right.
First worn: July 2012.
Wear again? Yes! I love the dress.
Accessories: Remix reproduction shoes (worth every penny), thrifted hat (changed the ribbon), pearl earrings, straw bag, trusty parisole (it was so hot!), crocheted gloves, petticoat that I "made" from a thrifted wedding petticoat. 

This dress was one of those "this is too easy to be true" dresses where you know something is going to go wrong! I did not like how the darts sat and redid them about a million times! I also do not like how the arm hole lining sits. I would make it longer. I notched it a bunch and it still did not sit correctly. The pictures were taken in Rich's aunt/uncle's yard and then at the park the wedding was held in. There's a few piccys!


I had to add a cute shot of the "soon to be"
 
Such nerds! Doing our own photo shoot while the bride and groom took pics!

 
 Although cute, the pictures don't show all the work in the dress. This dress seriously required EPIC gathering. I used Colette's trick of three lines of basting to gather. 
Crazy gathering!

I understand now why they have you make a cummerbund! To cover all these funky gathers!


I am proud of how closely I matched up the lines. This is only my second cheveron dress and I am pleased with it :) 


Tuesday, July 17, 2012

Simplicity 3748 HELP!

I need some help with the Simplicity 3748 retro shorts. They came out just awful! They look great until I put them on and then they are a hot mess and a 1/2. This was a "practice" set made from some free material, but I am still upset at how they turned out. I am not sure if I need to extend the seat or what (they kinda ride up, if you know what I mean). The short leg-holes are so wide I could become a flying-squirrel with them! I have made the bolero in this set and adore it, I was hoping for the same result with the shorts. I was wondering if anyone out there has attempted to make these before. Any help would be great.

This is a picture of the pattern:

Darts with Artist's Tape

I recently got a snippet from Colette about ways to improve your dart making skills. And I don't know about you, but I always fuss over how my darts look! No matter what I do they aren't perfect; chalk, pins, basting lines all did not result in a perfect dart.

In this snippet it said to use artists tape to mark along the dart lines. I figured, "what the hell?" and went to Joann's with my 40% off coupon to get some. After much hunting a nice lady found it for me in the fancy painting supplies (not the crafter paint the faaaaancy paint lol). I picked up a low-tack tape and was on my way.

I did the same as always, marked my darts, blah blah (won't bore you with the details) but then I used this tape and put it on the leg of my dart on both sides. And I am telling you, man did it make it easy to match up the legs in an exact manner. I then pinned the darts, pressed (I was worried the tape would melt, it did not because it is paper), and used a zipper foot to stitch. By using the zipper foot I was able to get right up next to the tape line. I made a mistake on one and went through the tape a tiny bit. I was worried I would have to unpick it because the tape would be stuck. I figured I would try to rip the tape off and if I saw it ripping the stitches I would stop. To my delight the tape came off super easily! I then pressed the dart in the correction direction and finished it off by tying the tail ends. (hats a whole other lesson I learned about darts a few years back!)

The lesson of this story: try Art tape out. It's $3.50 without a coupon. Why not pick some up on your next trip to the craft store?

**I had a question about what exactly this tape did for creating a dart. I'm sorry I was not more clear as I was typing (blame the espresso ;) ). The tape helped: stabilize the fabric during sewing and made the fabric more manageable for a precise matching of the marks, enables the dart to be tapered correctly so the end/tip of the dart did not pucker, created an excellent straight line to follow. I hope this clarifies things**

Monday, July 16, 2012

More Patterns!

Recently a friend of mine had a garage sale and was getting rid of her sewing stash. I wasn't able to make it the day of the sale but I did swing by the next day. The darling said I could have it all, as payment I took her donations to a thrift store. After sorting through scraps etc. I found some gems. Check out the pics :)

I am thinking about using the brown fabric for that 1940s simplicity pattern. I'm worried the fabric is not time appropriate, it has a suede to it. What do you think?

Now I have to actually start sewing instead of watching Law and Order reruns!

Friday, July 13, 2012

Simplicity Retro

Simplicity patterns are in sale at Joann's this week so of corse I had to pick some up while I was there getting MORE material for my practice wedding dress (more about that later).

I picked up the new 1940s pattern they just came out with along with baby patterns. I know the baby ones aren't new but I have a few friends that have buns in the oven or just had a kid-o and I thought I needed the patterns. (notice the word need lol). I really like the woman's pattern I picked up. I don't look very good in dresses from the 1940s but I would like to try to make this one for winter.

Speaking of winter, is anyone else totally wanting to sew for winter? Maybe it's my desire for the 110+ weather to be over but I want to make some coats and heavy dresses.

Anywho- enjoy the pattern pics!

Tuesday, July 10, 2012

Welt pocket- take 2

This is my second attempt at the welt pocket. I sewed the pocket bag thing in wrong but that wasn't the part I was concerned about. I like how the welt came out this time.

Welt Pocket - Take 1

After calling for help in an earlier post and wanting to throw my fabric down after what seemed like hours of youtube tutorials I used an awesome tutorial by Melanie on Seamstress: Poppykettle on welt pockets. I am proud to say after what seemed like hours I have made my first welt pocket. Check that one off the list :) I think I did it correctly. But I do have some questions! (Also, seeing this was only a rough-draft I used white thread. I hope this doesn't distract you!)

1. How do you make sure your welt rectangle is straight? I am drafting it so I have no pattern.
2. How do you make it so it does not looked "pulled"? I am assuming it is because the stiching lines when I first started were not perfectly even.
2a. How do I ensure my stitch lines are even? My machine back-stitches kinda funky. Any hints?
3. The welt seems crooked. Why??
4. Any other hints/helpful tricks?


Sunday, July 8, 2012

A few first times.

I am doing a few "firsts" on my next project.

First time I am:
1. Sewing for someone else. Even though it's my soon to be.
2. Making men's wear. I kinda-sorta started a mans suit once, but that went terribly wrong. (see other post lol) and now this said project is in a pile under my sewing table.
3. Making a welt pocket. It's Rich's favorite type of pocket. So instead of doing the traditional "slap on" (that's what he calls it) pocket I am going to try to make a welt pocket.
4. Making a shirt in general. In all my years sewing I have never made a shirt. Lots of dresses and skirts, never a shirt.
5. Attaching more than 2 buttons that have to adhere to a certain pattern. I am worried about this one! Rich is excited he gets to pick from my vintage button collection. He is so picky I hope he can actually find something he likes, but at the same time I don't want him to take my faves. I know, I am greedy!

I am using a thrift store pattern find ($0.70) simplicity 5581, view A. (see picture) It's a modern pattern but I may shorten it so he can wear it with high waisted pants. I am using some thrifted cotton blend fabric I found for $5 for the bolt. I figured if the shirt looks like a 5 year old did it I wouldn't be too mad. I only would have waisted thread and time.

Stay tuned to see if I swear off sewing men's wear!

Thrift store pattern

Even though our thrift stores are really drying up once in a while I find something that makes me say, "Oh I will just go and check". I found a pattern from 1959 for $0.70. I know some ladies find them all the time back east but it's so rare to find anything here. Now I need to take the plunge and learn to resize! I adore the back tie jacket on this baby! Now to get her home and see if she's complete.

Friday, July 6, 2012

Learning the Hard Way

I have learned the hard way that you shouldn't actually CUT your patterns! When I first started teaching myself to sew (thank you Youtube) all the tutorials had you CUT your patterns, so I did too! This went on for years until I messed up cutting the wrong size pattern and I purchased my first uncut vintage pattern.

I thought long and hard about how to remedy the situation of ruining a pattern that has lasted over 50 years and to never cut the incorrect size again. I turned to Youtube and the sewing blogs. They told me to go and get pattern "paper" which I discovered was in the interfacing aisle. I was floored when I saw how much it was and that it was very thick.  I could not figure out how to "trace" the pattern. They said to get one of those pattern wheel doo-hickeys but that pokes holes/dents your pattern and quite honestly, it is a lot of work for this lazy sewer! I sat there pondering thinking, "Surely there is another way!" I called my mother to chat about it- she suggested tracing paper (another costly alternative). Then it hit me (around Christmas time none-the-less) tissue paper! You can buy it for so super-duper cheap and it comes in large sheets.

Why it has taken me this long to come to this point in my sewing journey, you got me. But from that day forward I trace all my patterns, new and old, and store them with my original pattern. The steps are really quite easy!

1. Iron the original pattern. (No steam and all that good stuff. If you have a Walmart special iron, like mine, you may want to remove the water from the iron).

2. Iron the tissue paper.

3. Put the original pattern face up on a flat surface. Place the "tracing" tissue paper over it. I sometimes need more than one sheet of tissue paper. Make sure to tape where there isnt anything important.

4. Secure. I use large washers that my soon to be got me from a home improvement store. This way I am not using pins. 

5. Trace.

6. Nicely put your original back in the envelope. This part takes me the longest. Stupid confusing fold lines!

7. Cut your tissue piece. Too-dah! I make notes and what not on my tissue paper version.

Look how easily you can see the pattern through the tissue paper!


Thursday, July 5, 2012

Red, White, and Boob *ahem* BLUE

Yes! I said, "boob!" As you can see in the picture where I am flashing the camera it is a little big and droops. BUT when I tightened it up, it was way too tight and squished the "girls". The top on this dress is still on perfect, I still need to work on it. Not sure what to do to make it work. Thoughts??

This was my "first" on a few things! It was my first attempt at sewing anything with lines. After having this fabric in my stash for years I decided to take the plunge and make a dress! The hardest part about the stripes- the darts! I am still working on that one. Any helpful hints on how to concur these striped darts would be great.The second "first" was top stitching. I mixed red and white thread together in the upper needle to get the patriotic feel. I must admit, I was very pleased with the outcome. (The soon to be was impressed too!)

Back to the "boob!" This dress top is VERY low cut. I was a tad self-conscious and kept the jacket done up. I was surprised it was so low, usually Butterick patterns are pretty modest. I had to button it higher than what the pattern called for. Which is odd- I usually have to lengthen things because I am so tall.

Ok I promise, I won't say BOOB again! Hope everyone had a wonderful fourth.


The Facts
Fabric: Cotton with a sheen (not sure what that is called) and blue cotton.
Lining- Lined with the same fabric.
Pattern: Butterick Retro 5214
Year: circa 1947
Notions: zipper and covered buttons
Time to complete: Under 8 hours but the fitting took a while. A whole lot of basting :)
First worn: VLV 2012.
Wear again? Yes! For the Fourth of July!
Accessories: Remix reproduction shoes (worth every penny), red Bakelite bangles and rose earrings.